The world of macro photography—where tiny subjects become titans—often seems gated by expensive, specialised gear. However, the path to incredible close-ups often starts with the lens you already own: the versatile 50mm standard lens.
By combining a simple 50mm lens with an extension tube, you can dive deep into the micro-world without breaking the bank. But how does this setup compare to a dedicated macro lens? And what other tricks can we use? Let's break down the world of budget-friendly macro.
The Extension Tube Advantage
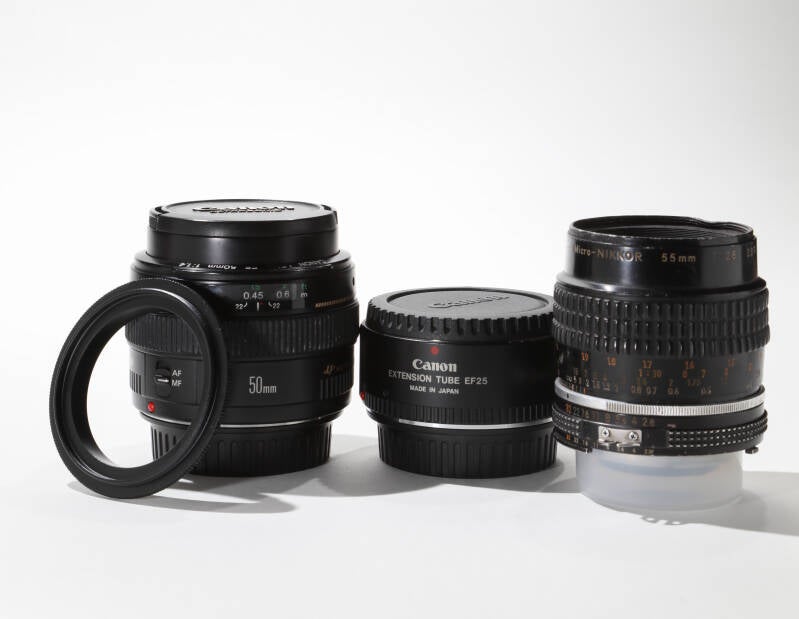
An extension tube is simply a hollow ring that mounts between your camera body and your lens. It contains no glass. Its purpose is purely to move the lens further away from the sensor, effectively reducing the lens's minimum focusing distance and allowing you to focus much closer to your subject.
This is the magic ingredient that turns your standard 50mm into a capable macro tool
Reverse the Lens: Extreme Magnification on a Dime
For truly extreme, budget magnification, you can try reversing your 50mm standard lens. This technique uses a simple reversing ring that screws into the lens's filter threads, allowing you to mount the front element facing the camera sensor.
The benefit here is incredible magnification, often far exceeding 1:1. However, be aware that you lose automatic focus and aperture control (unless you buy specialised rings), and your depth of field becomes razor-thin, demanding precise lighting and technique.
The Benefits of a Proper Macro Lens
While the DIY methods are great for experimentation, a proper macro lens offers several crucial benefits that make the investment worthwhile for serious work:
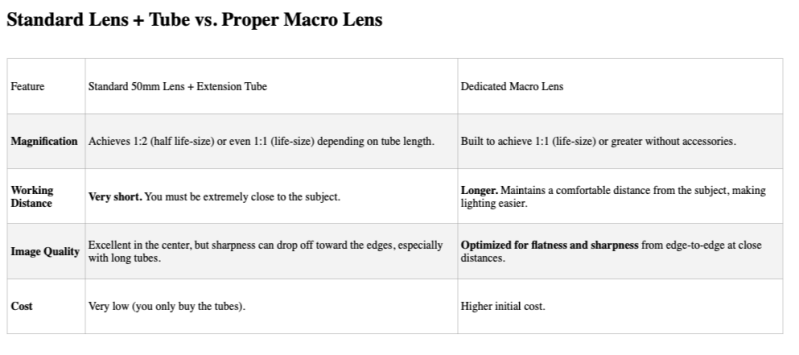
- Superior Working Distance: This is the biggest practical benefit. A dedicated macro lens allows you to achieve 1:1 magnification while keeping the lens further away from your subject. This is essential for:
- Lighting: It gives you room to place your flashes or lights around the subject without casting shadows with the lens barrel itself.
- Live Subjects: It prevents you from scaring away insects or casting shadows over small plants.
- Flat-Field Design: Dedicated macro lenses are optically designed to ensure the image plane is perfectly flat and sharp right up to the edges, which is vital when photographing flat specimens or large insects.
- Automatic Functionality: You retain full electronic communication with the camera for autofocus and aperture control, which significantly streamlines your workflow.
Modern vs. Vintage Macro Lenses
Given that you can now adapt almost any lens onto a modern mirrorless camera, the choice between modern and older macro lenses can be tough.
Benefits of a Modern Macro Lens
- Better Optics: Modern lenses are designed for today's high-resolution sensors (like your Canon 5DSR) and often feature superior coatings that minimise flare and chromatic aberration.
- Built-in Stabilisation: Many modern lenses include image stabilisation, which is helpful if you are shooting handheld or even working on a shaky platform.
- Autofocus Speed: If you ever shoot subjects that move (like live insects), modern autofocus performance is a significant advantage.
The Appeal of Vintage Macro Lenses
If you are looking to purchase an older macro lens for adapted use, look for lenses renowned for their optical quality and mechanical build—lenses that were popular in the film era.
A great example is the Micro-Nikkor 55mm f/2.8 or the Canon FD 50mm/100mm Macro series. These older lenses are often very sharp, feel fantastic to use (precise manual focus is key in macro), and can be found affordably. Since you are likely manually focusing and using controlled flash anyway, you don't lose much functionality.
Essential Accessories for DIY Macro
When working with a makeshift macro setup, a few accessories are incredibly useful:
- Tripod and Focusing Rail: Since your depth of field is minimal, a sturdy tripod is essential. A focusing rail (like your modified microscope stage) allows you to move the camera or subject in precise, tiny increments—a necessity for setting up a focus stack.
- External Flash/LEDs: With your lens so close to the subject, you'll block almost all ambient light. You must use controlled light (like your Godox MF12 flashes or small LEDs) to properly illuminate the scene and create the necessary dramatic mood.
- Tethering: Using a computer and software (like your Canon Utility 3) to tether your camera is critical. It eliminates camera shake from pressing the shutter button and allows you to confirm fine focus and exposure on a large screen instantly.
Add comment
Comments